New Program Sign Up Flow
Sign Up Flow Overview
The Sign Up Flow consists of 7 steps for Parents who have never registered their Child for the Programs and do not have a platform account.
Parents must complete Step 1 to gain access to the platform.
After completing Step 1, the Parents will be automatically signed into the platform, where they can complete the remaining steps.
Sign Up Flow consists of the following steps:
- Step 1: Sign-Up page for Parents
- Step 2: Choosing the Program
- Step 3: Child's Information
- Step 4: Payment
- Step 5. Parent Information
- Step 6: Additional Authorized Pick Up
- Step 7: Medical Information
- Final Step
Step 1 - Sign Up page for Parents
Parents receive the link shared by the School Administration and click on it to register their child for the After School Programs.
The Parent Sign Up page:
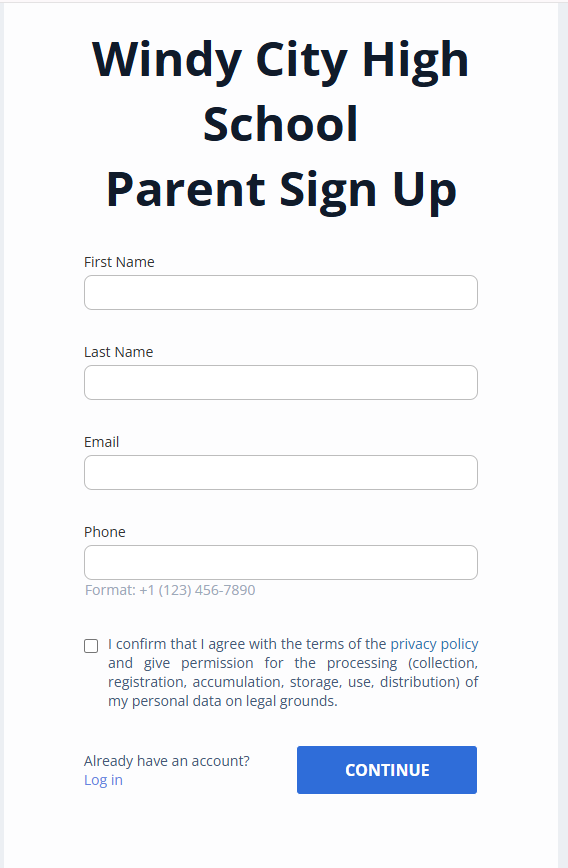
Fig. 2. Parent Sign Up Page
-
If the Parent already has an account, they can click on the "Log in" button to open the Sign-In page.
-
If the Parent doesn't have an account, they should fill out the Sign Up form and submit it to proceed. The First Name, Last Name, Email, Phone fields and Privacy Terms Agreement are essential for processing the registration, so these fields are required to proceed to the next page.
-
Once the 'Continue' button is clicked, a new Parent's account will be created on the platform. The next step of the registration form will be available.
Additionally, the Parent will receive a welcoming email with the Sign-In details.
Step 2 - Choosing the Program
-
After signing in to the platform, the Parent will see the offered After School Programs page, which consists of the following components:
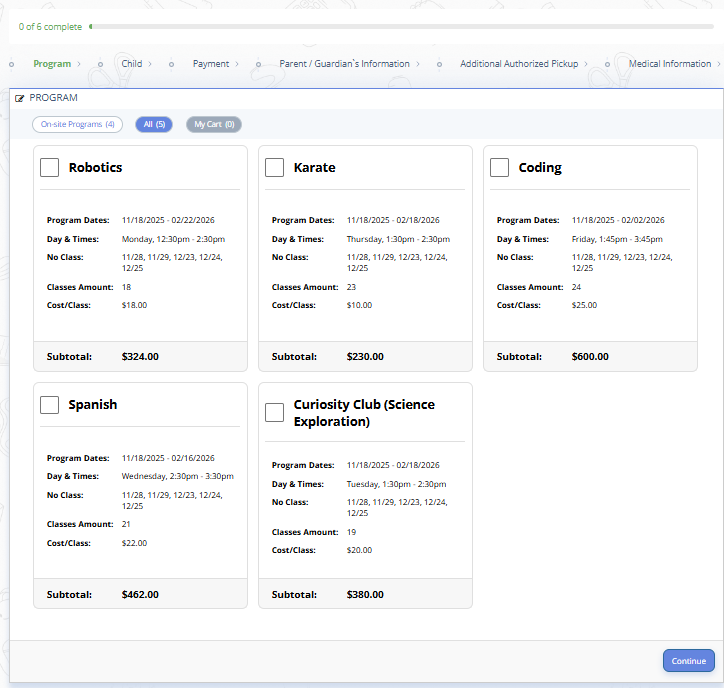
Fig. 3. Parent Sign Up Step 2: Choosing the Program- Progress Bar: Indicates the progress of completed steps compared to the total steps.
- Onboarding Checklist: Displays the titles of steps that need to be completed to submit the registration form.
- AfterSchool Programs List: cards displaying the variety of offered Programs at specific school with the detailed information about each program, in particular: program dates, schedule, no class dates, total number of classes, cost per class, total cost per session.
- My Cart: stores the selected programs for further check-out.Note: The After School Programs page always opens on the first uncompleted step from the Onboarding Checklist.
Note: Until the Parent completes at least one Child registration, all pages that they can open by clicking on the UI components (Burger Menu icon, Notifications, Profile) are disabled. Any platform link will always open the first uncompleted step from the Onboarding Checklist.
Note: The system does not allow selecting programs that run at the same time (i.e., programs with overlapping schedules). -
Choose the required programs. After selecting the required program, the available billing option and estimated total cost will appear at the bottom of the page.
-
Click “Continue”.
The step is marked as completed in the Onboarding Checklist, and the Progress Bar is updated to show the count of completed steps.
Step 3 - Child’s Information
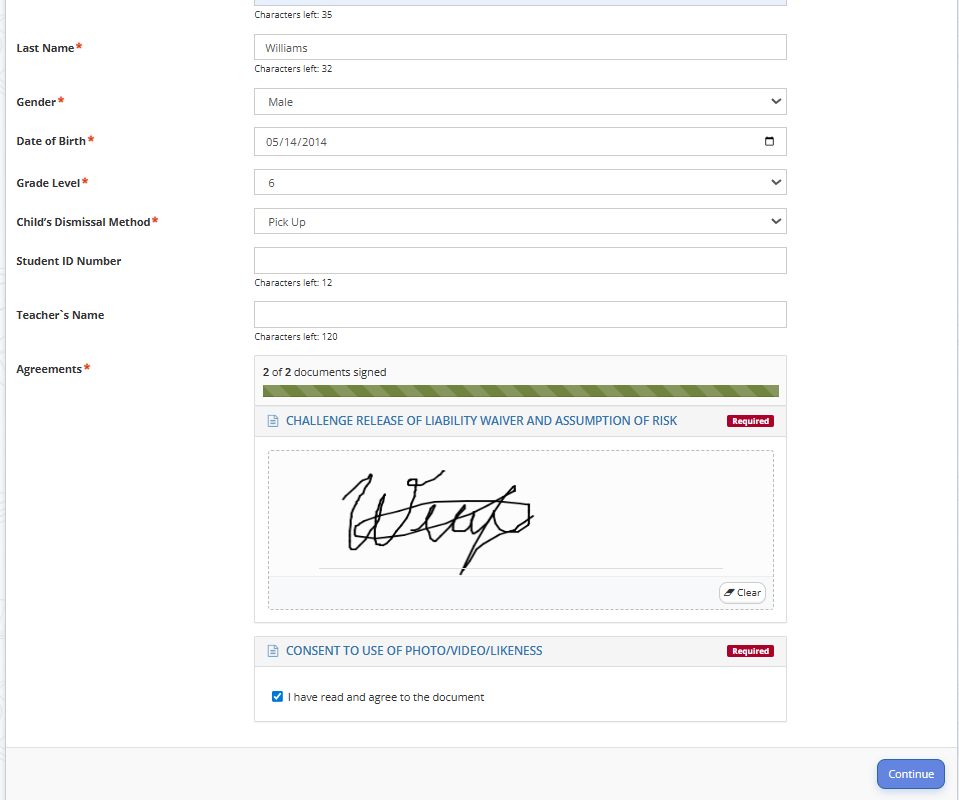
Fig. 4. Parent Sign Up Step 3: Child's Information
-
The Parent must provide the following information in the “Child” form:
- First Name, Last Name;
- Gender;
- Date of Birth;
- Grade level;
- Child’s Dismissal Method (choose between: walker, taking bus, pick up, club house/after care, CAPE or puente);
- Student ID Number (optional);
- Teacher`s Name (optional);
- Agreements which require e-Signature (drawn/checkbox/text). -
After filling in all the fields and clicking the "Continue" button, the step is marked as completed in the Onboarding Checklist.
Step 4 - Payment
⚠️ If the pricing type is set up as "free", this step will be skipped.
-
On the Payment Step, the Parent can see the summarised information with the title of the program, child’s name, billing option (including split-payment/discounted option if any) and total amount to pay.
One-time payment option:
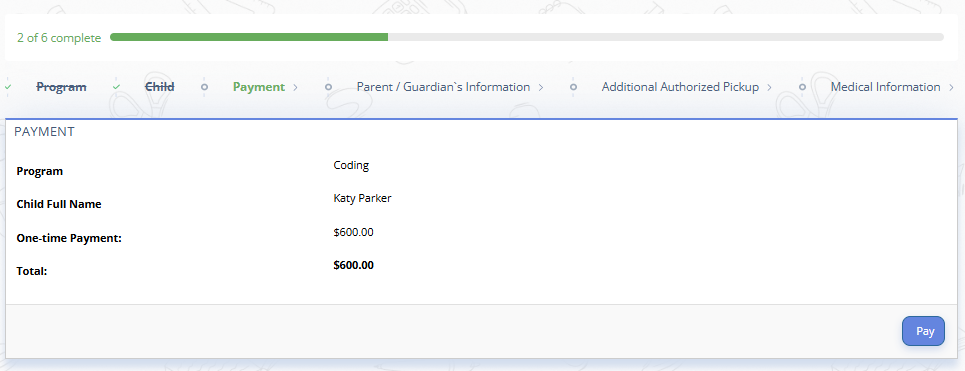
Fig. 5. Parent Sign Up Step 4: One-time PaymentPayment option displays a discount:
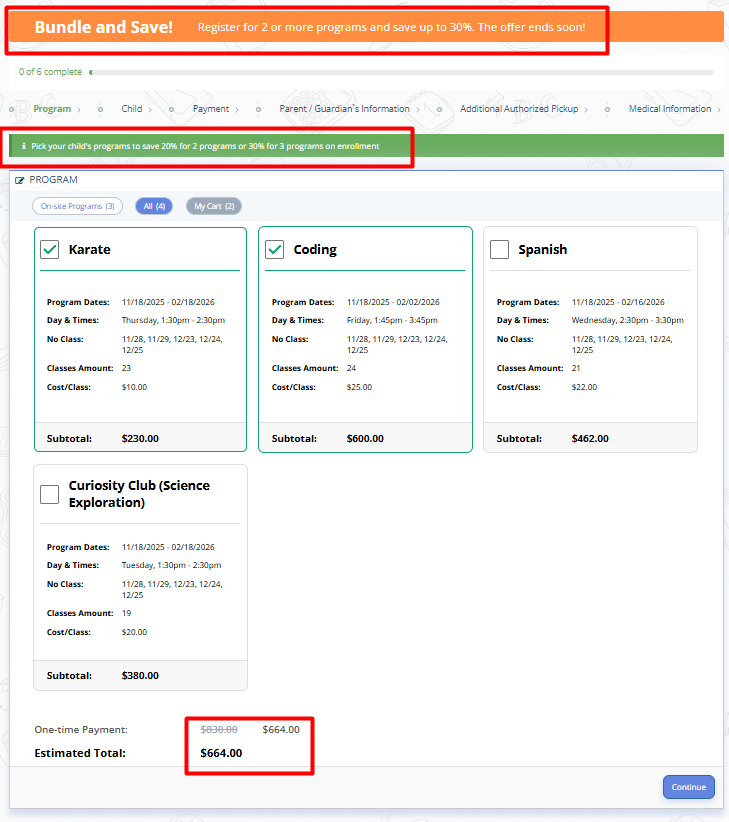
Fig. 6. Parent Sign Up Step 4: Discounted Payment displaySplit Payment option display (parent needs to check the box):
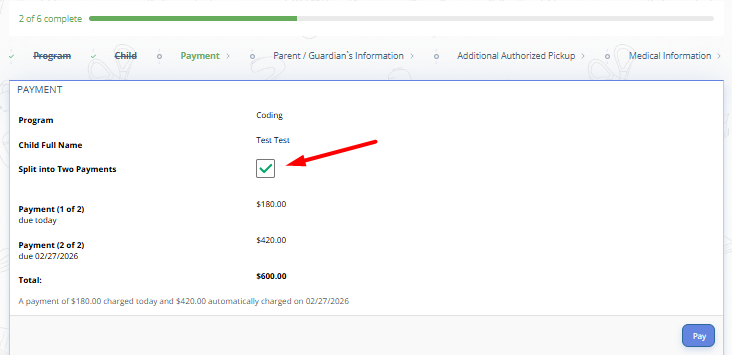
Fig. 7. Parent Sign Up Step 4: Split Payment Option -
To proceed with the payment, click 'Pay'.
When clicking "Pay," the Parent will be redirected to the Checkout page to complete the transaction.
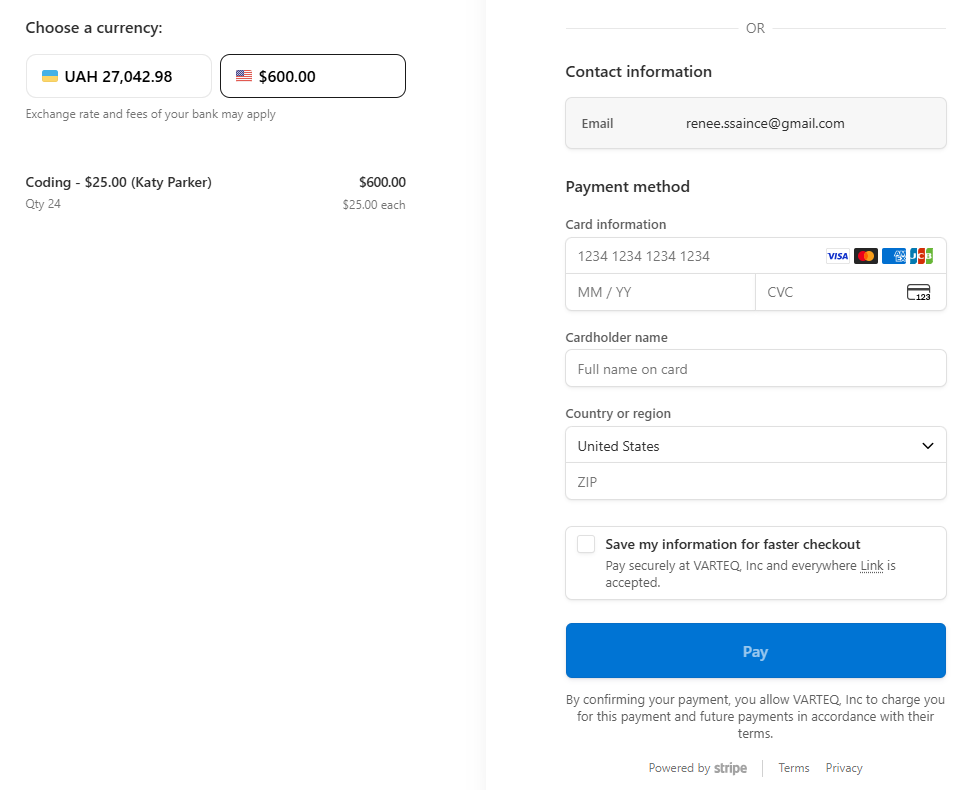
Fig. 8. Parent Sign Up Step 4: Stripe Check Out PageThe Payment system will track the payment details including the Program Name, Child Name, Total Price, and Billing Type (subscription, one-time payment, etc).
All payments will be processed by Payment Gateway. -
After the payment is completed and confirmed by the Payment system, the step is marked as completed in the Onboarding Checklist.
Step 5 - Parent/Guardian`s Information
⚠️ The Relationship types must be added beforehand.
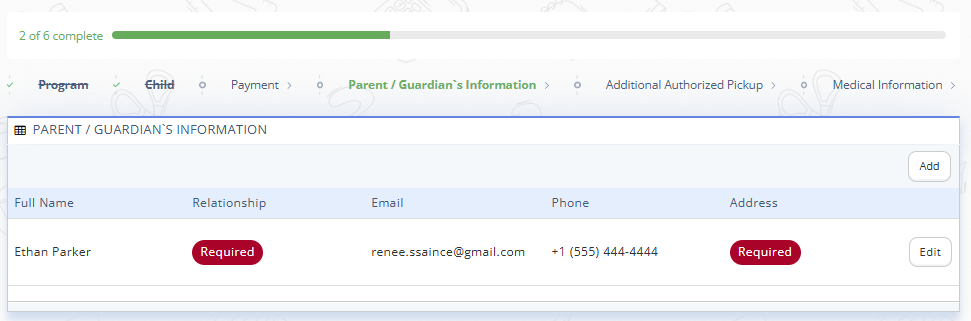
Fig. 9. Parent Sign Up Step 5: Parent/Guardian's Information
- The Parent/Guardian's Information form will always be opened with the Parent's info recorded during the Parent Sign Up. Any missed required fields are outlined in red for easy identification.
- To input any missed information, click the 'Edit' button next to the Parent record.
-
Fill in the required information in the 'Edit Parent/Guardian's Information' window:
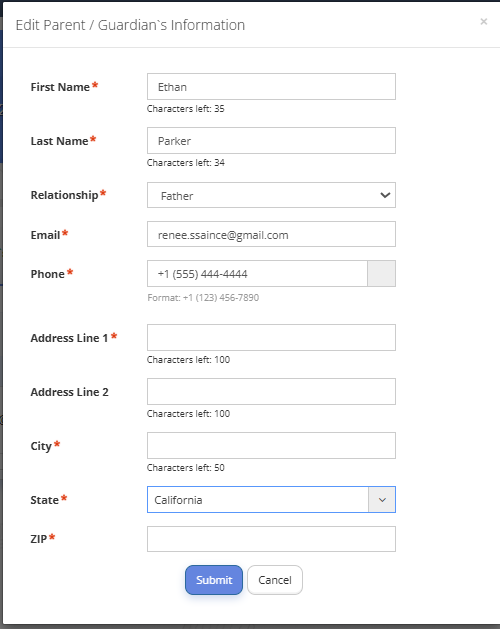
Fig. 10. Parent Sign Up Step 5: Editing Parent/Guardian's Information -
To add one more Parent, click the “Add” button and fill out required details in the 'Add Parent/Guardian's Information' window.
- After filling out all fields for at least one Parent or Guardian and clicking the “Submit” button, the step is marked as completed in the Onboarding Checklist. Move to the next step in the progress bar.
Step 6 - Additional Authorized Pickup
⚠️ The Relationship types must be added beforehand.
This section lists other individuals, besides the primary guardian, who are permitted to pick up the child.
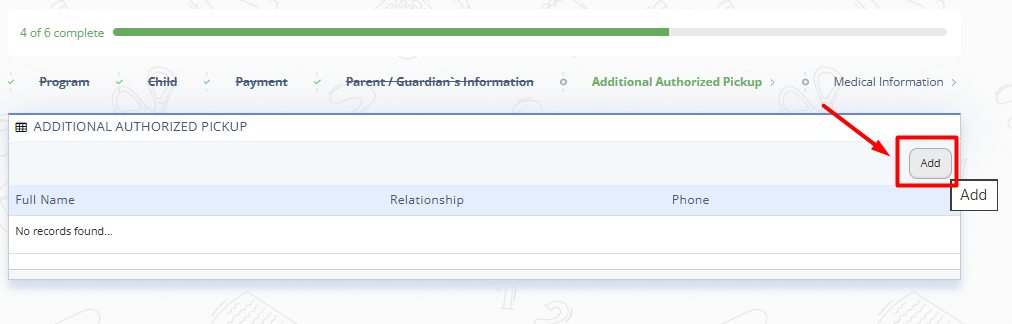
Fig. 11. Parent Sign Up Step 6: Additional Authorized Pickup
-
To add an Additional Authorized Pickup, click the 'Add' button and fill out the required details in the 'Add Additional Authorized Pickup' window:
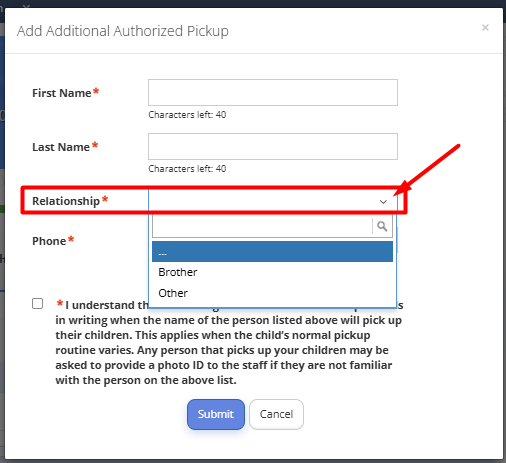
Fig. 12. Parent Sign Up Step 6: Additional Authorized Pickup Filling InNote: Choosing the 'Other' value in the 'Relationship' field adds one more field to be filled out - 'Other Relationship'. This is a free-text field for cases where the appropriate relationship hasn't been pre-created.
-
Click “Submit”.
- The “Additional Authorized Pickup” representative record can be edited or removed.
- After filling out all fields for at least one Additional Authorized Pickup and clicking the Submit button, the step is marked as completed in the Onboarding Checklist.
Step 7 - Medical Information
Medical Information form comprises three main blocks:
- Medical information:
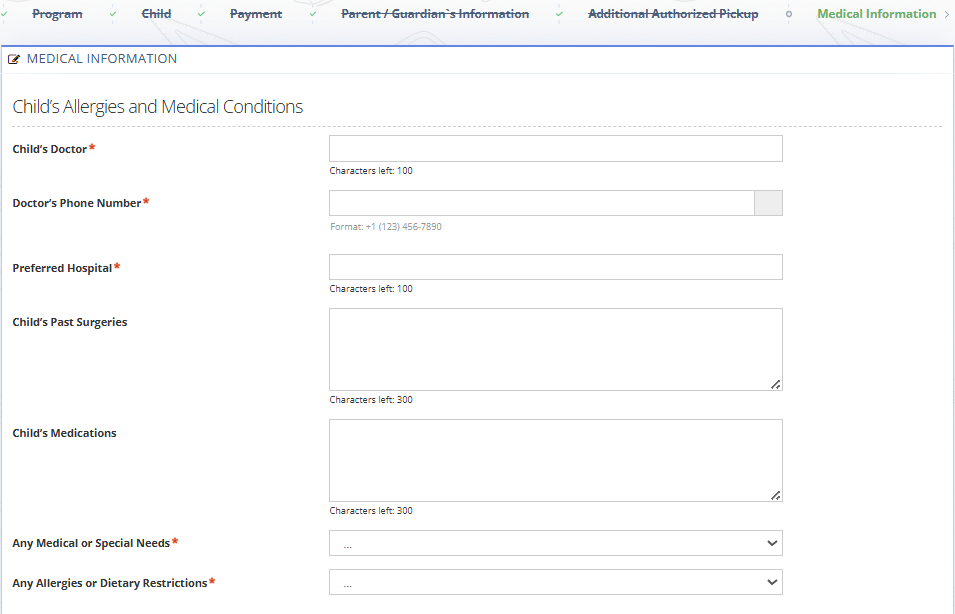
Fig. 13. Parent Sign Up Step 7: Medical Information
- Caregiver Information:
Caregiver Information is the primary or authorized adult contact for the child.
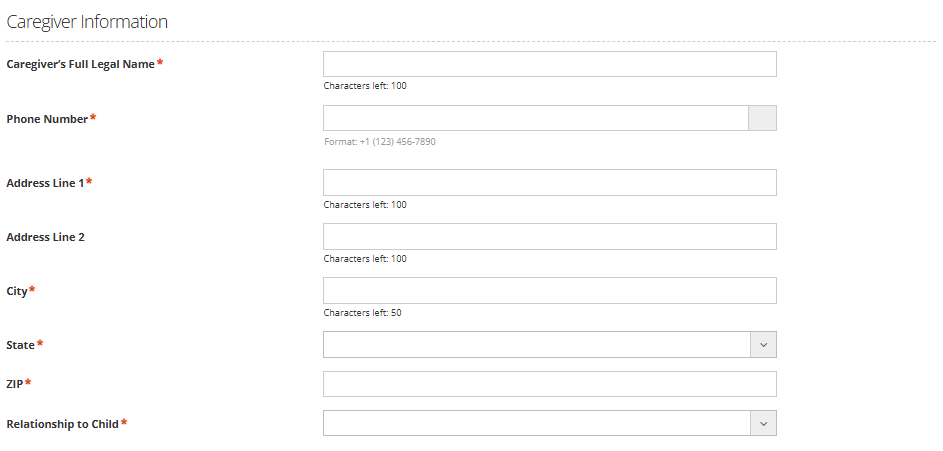
Fig. 14. Parent Sign Up Step 7: Caregiver Information
- Minor Medical Consent:
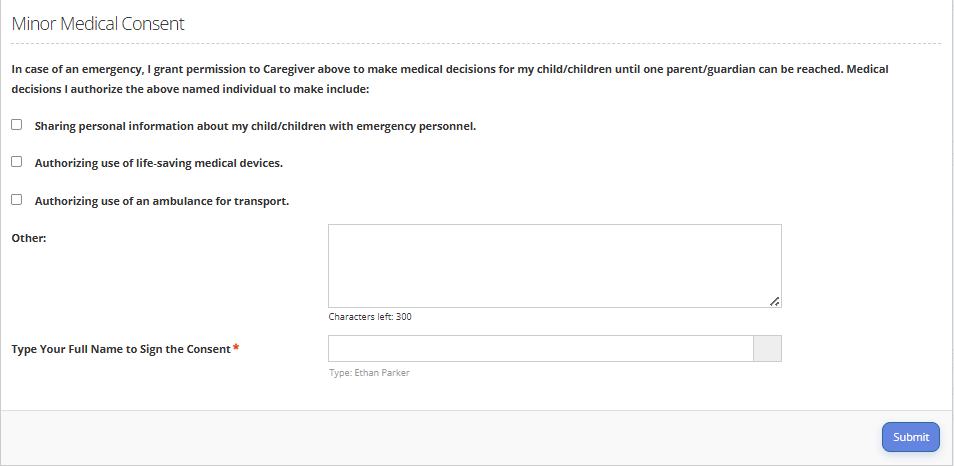
Fig. 15. Parent Sign Up Step 7: Minor Medical Consent
-
To complete the form, all required fields of all three blocks should be filled in.
Note: Choosing 'Yes' in the 'Any Medical or Special Needs' and 'Any Allergies or Dietary Restrictions' fields within the Medical Information block prompts additional fields to provide specific details regarding these conditions.
Note: If Parent chooses 'Other' as the value in the 'Relationship' field within the Caregiver Information block, an additional field will appear for entering the 'Other Relationship'. This allows for free-text entry in cases where the appropriate relationship option hasn't been pre-defined. -
Before the Parent can submit the form, they must sign the consent by typing their full name as specified during Parent Sign Up - First Name followed by Last Name.
- After filling out all fields and clicking the Submit button, the step is marked as completed in the Onboarding Checklist.
Final Step
"Success Sign-Up" pop-up appears.
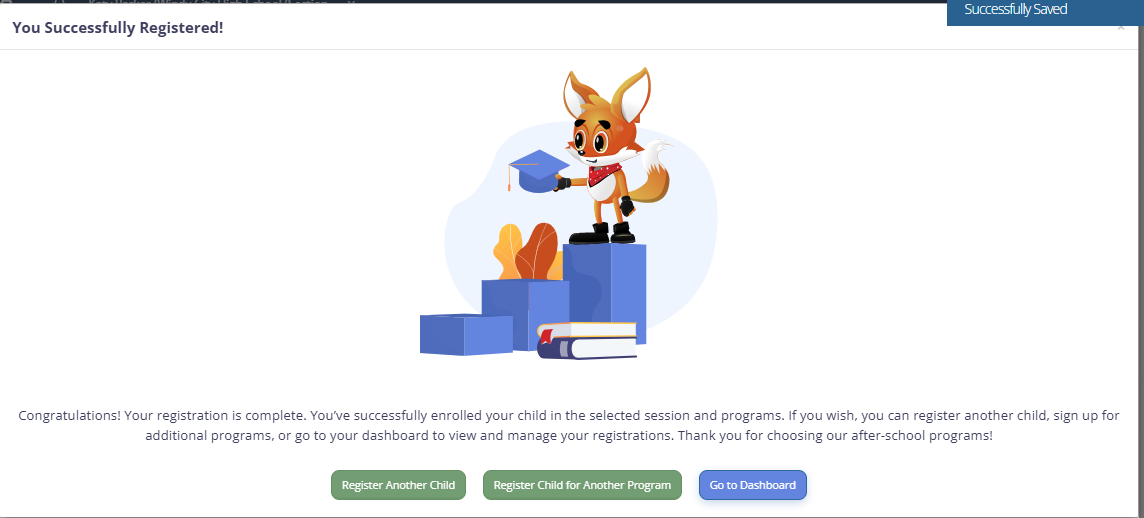
Fig. 16. Parent Sign Up Final Step
-
In the Success window, Parents can find information about the Program added by the Administrator, along with buttons indicating how to proceed with the next steps.
-
Clicking the 'Register Another Child' button opens the 'Program' form. The 'Parent / Guardian's Information' and 'Additional Authorized Pickup' forms are automatically filled with information from the previous registration. Parents can add another Child and sign them up for the selected program.
-
Clicking the 'Register Child for Another Program' button opens the 'Program' form. The 'Child', 'Parent/Guardian's Information', and 'Additional Authorized Pickup' forms are automatically filled with information from the previous Registration. Parents can then sign up their Child for the selected Program.
-
Clicking the 'Go to Dashboard' button redirects the Parent to the Timeline Page of their Parent Account.