Working with Home Assignment
Working with Home Assignments
⚠️ Important! Home Assignment must be attached to the specific lesson for which students are expected to complete it. ⚠️ Assignments assigned in the "Assignments" section are not displayed in the PDF journal. Only tasks assigned from the online Journal are fetched and displayed.
"Journal" Menu Section
- Go to the Journal menu section.
- Select the required date, section and subject.
- Click the ... button in the class column.
- In the dropdown list, select Assignment under the Actions header.
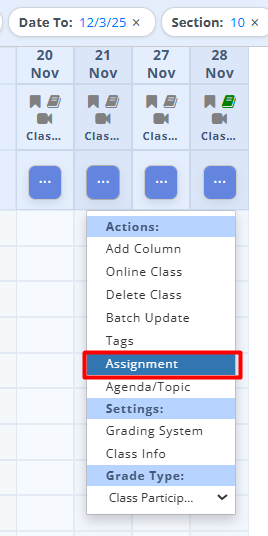
Fig. 1 — Journal section - Fill in the fields in the home assignment creation window.
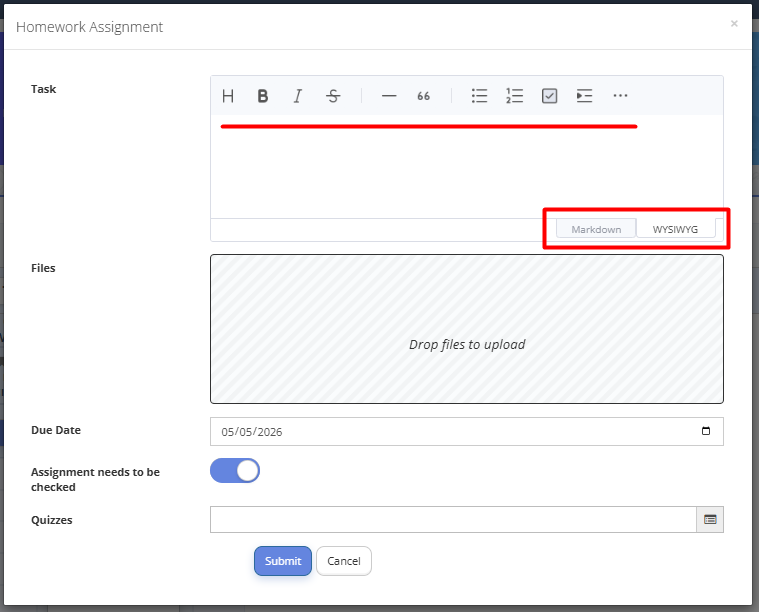
Fig. 2 — Adding home assignment - Describe the homework assignment in text, add formatting (styles using the formatting toolbar/editor, switching between the Markdown/WYSIWYG tabs).
At the bottom of the text field, there are two input mode switches:
Markdown is a way of formatting text using simple symbols. For example, bold or # Heading. The text looks like plain code, and formatting is applied only after saving or previewing. Suitable for those who prefer fast, keyboard-based text editing.
WYSIWYG (What You See Is What You Get) is a familiar mode, like in Word or Google Docs. You immediately see how the text will look: bold appears bold, headings appear large. Recommended for most teachers.💡 Tip: if you are unsure which mode to choose, use WYSIWYG.
- Add links to videos or websites.
- Attach files or presentations.
- Add a prepared quiz if needed.
- Select whether the task requires manual review. If the assignment includes a quiz and the “Assignment needs to be checked” toggle is off, the quiz result will be calculated automatically. If the quiz contains free response questions, reviewing the student’s answer will be required as a part of the home assignment check.
ℹ️ If you click ... in the class column and choose Agenda/Topic, a class topic editing window will pop up.Here a teacher also has an option to add a quiz. If a teacher adds a quiz here, the class topic is automatically converted into home assignment.
- Save the assignment.
- Check if a checkmark appears next to "Assignment" and that the book icon in the column header changes to green.
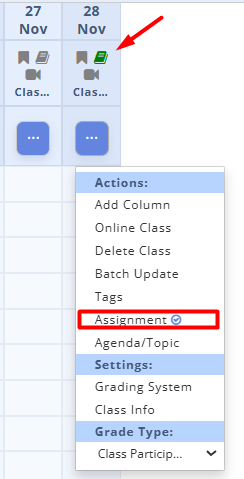
Fig. 3 — Assignment checkmark


How to Add a URL Link to the Assignment Field
Method 1: You can embed a link into a text label.
To do this:
- Go to the Journal section.
- Select the required day, subject, and class.
- Click the "..." button in the class column.
- From the dropdown menu, select Assignment under the Actions section.
- In the Assignment field, locate the "..." icon in the editor toolbar. Click it and then select the "Insert Link" chain icon.
- A form with two fields will open:
- a text field (the link will be embedded into this text);
- a URL field.
- Enter the text that should contain the hyperlink in the text field, and enter the class or assignment URL in the URL field.
- Click "OK".
- The link will now appear clickable.
Method 2: You can add a link directly into the Assignment text field.
Please be careful. Make sure there is a space before the link and that there are no extra characters immediately preceding it, such as periods, unnecessary brackets, colons, or a slash "/". If extra characters are present, the system will not recognize the URL as a hyperlink. Instead, the full URL will be displayed as plain text in the PDF Journal, causing the assignment text to shrink in size so that all content fits within the cell.
If you enter a URL directly into the Assignment text field, it will automatically be converted into the word "link", which will be displayed in the PDF Journal.
Home Assignment Review Process
- Go to the Assignments menu section.
- Enter the filter parameters: date, teacher, subject, assignment, section, upload date, and the "Review" status.
- Click 🔍 to search.
- Click
 next to the student whose home assignment needs to be checked and select "View".
 - In the Information tab, download the student’s files by clicking the blue arrow under the file.
- If the home assignment is incomplete or incorrect, or the file is missing, click Decline.
- Add comment and send the home assignment back to the student for improvement.
- If the home assignment is completed correctly, click Give a Grade.
- Enter the grade, select the grade type, and click Submit.
- If needed, check “Record grade in Journal?” (if the assignment was assigned through the Journal section, not the Assignments menu section).
- Click Submit after review is completed.
Quiz Review
- Go to the Assignments section.
- Enter the filter parameters: date, teacher, subject, “Quiz” assignment type, section, upload date, and status "In progress" or "Review".
ℹ️ The assignment will appear as "In progress" if manual review was enabled and the student did not upload a file, or as "Review" if the “Assignment needs to be checked” toggle is off.
- Click 🔍 to search.
- Click next to the student and select "View".
- In the Information tab, click on the quiz to review it.
- Click Give a Grade to evaluate the quiz.
- Enter the grade, select the “Quiz” grade type, and enable “Record grade in Journal” if needed.
- If the quiz contains free response questions, enter the number of points for each answer.
- Click Submit after scoring.
⚠️ Important! The score for each question follows the quiz internal scoring system. The maximum score cannot exceed the predefined limit.