Parent Dashboard
Upon successful registration of their Child to the After School Program, the Parent gains access to the Parent Dashboard.
Parent Login
Follow the "Signing In to the Platform" User Guideline to log into the Parent Account.
A parent can log in to their account either via Platform Log In Page or through the Program Sign-Up Page.

Fig. 1. Program Sign-Up Page
Children Section

Fig. 2. Parent Dashboard
"Children" page includes the following components:
- Children List: A table displaying all Children added by the Parent during registrations for the After School Programs.
- 'Add' button: Allows the Parent to add a new Child to their account for further tracking of their study performance (a child must be registered as a student on the platform and assigned to a school workspace by Admin beforehand).
- Section: A child will be added to the section specified in the program configuration.
Related User Guideline:
Add a Child to Parent Account UserGuide
Child's Programs
- Children List: A table displaying all Children added by the Parent during registrations for the After School Programs.
- Section: A child will be added to the section specified in the program configuration.
- "Add" button: allows adding another child to the Program.
- "Add Program" button: allows adding existing child to a new Program.

Fig. 3. Child's Programs Overview
- Navigate to the "Programs" section in the menu on the left.
- Click on the Child Name in the Children list.
- On the Child's Programs page, Parents can click on the Program name to review the details of the Program for which they have enrolled their Child.
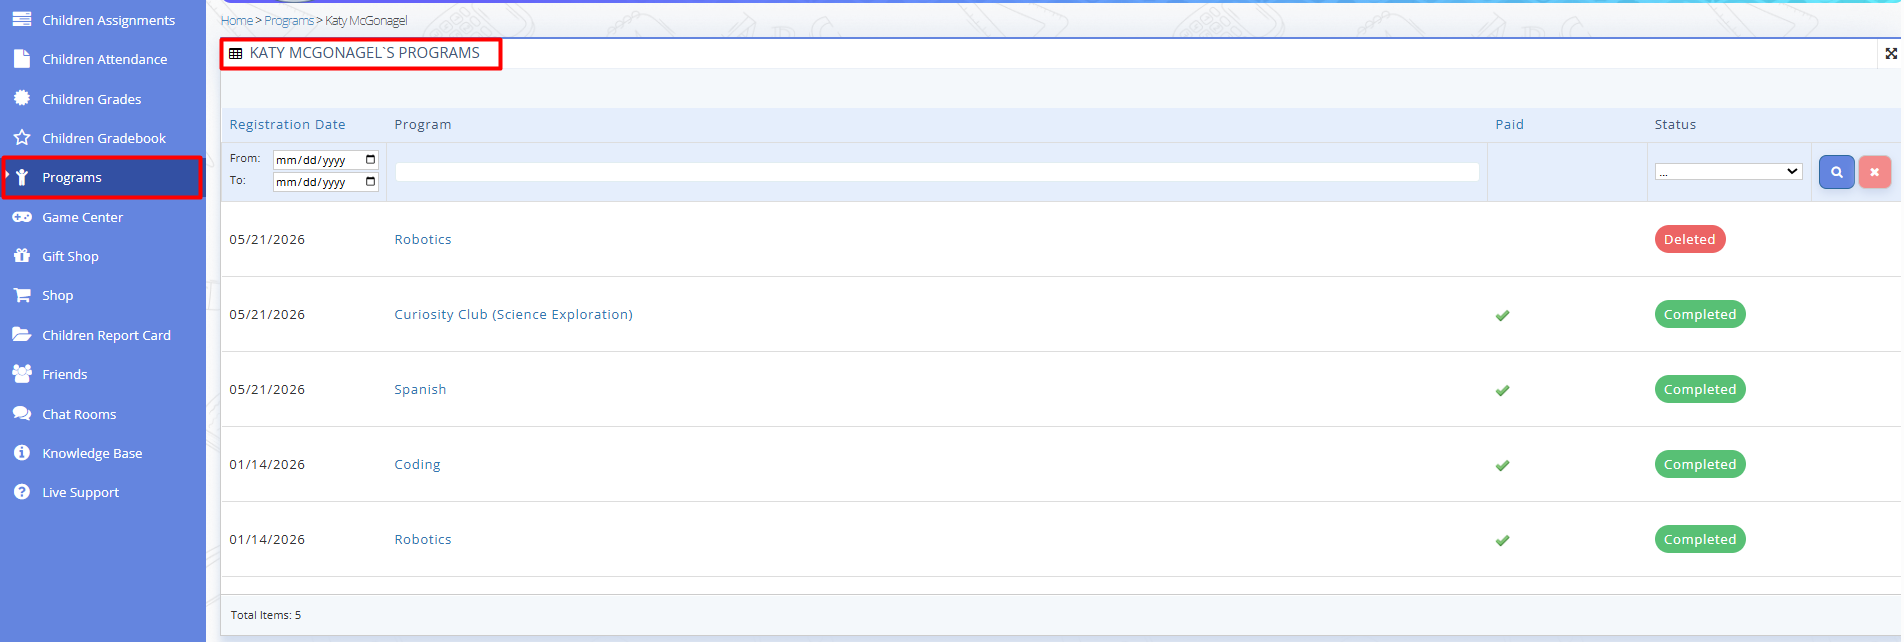
Fig. 4. Child's Programs List

Add another Child to the Program
- Click the 'Add' button at the top right corner of the Children list in the Programs menu section.
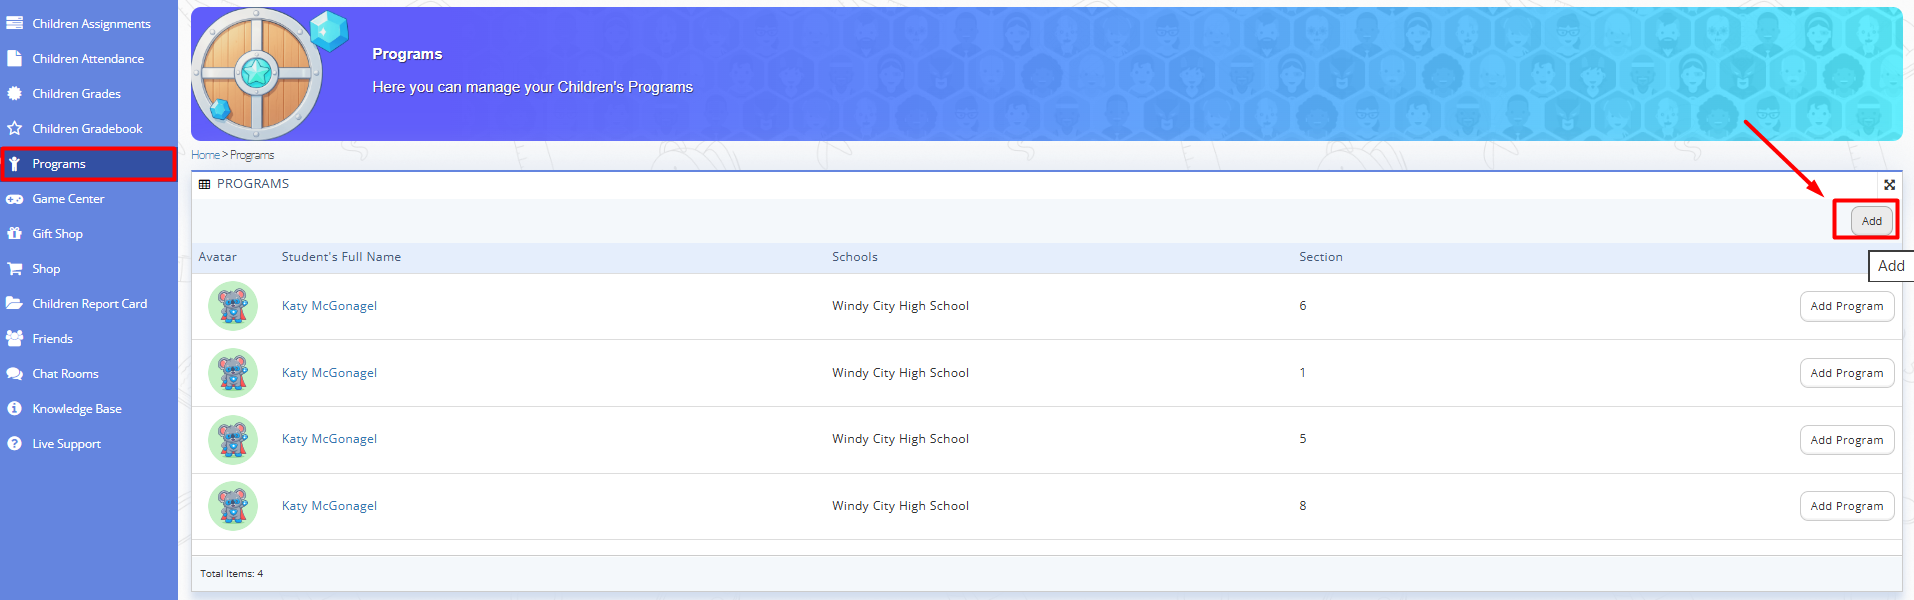
Fig. 5. Adding another Child to a Program - The 'Program' form from newly initiated Onboarding Checklist is displayed. Select the required Program.
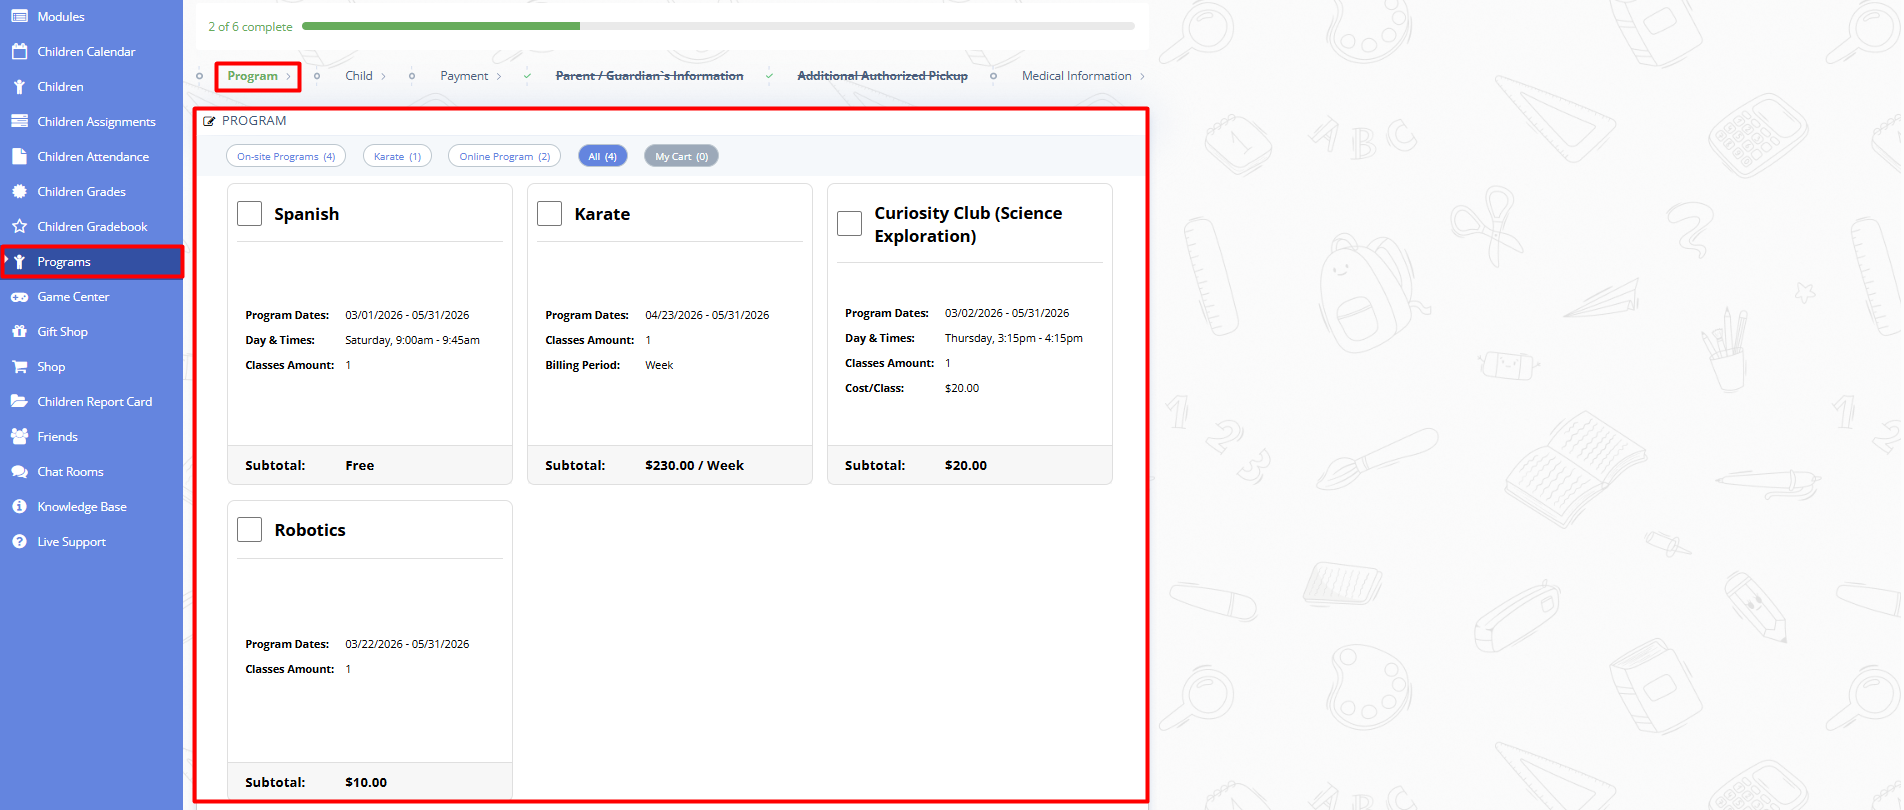
Fig. 6. Programs' List to select - Click "Continue".
- The Child's Information block will appear. Click on the dropdown list in the "Select a Child" field and select a required child.
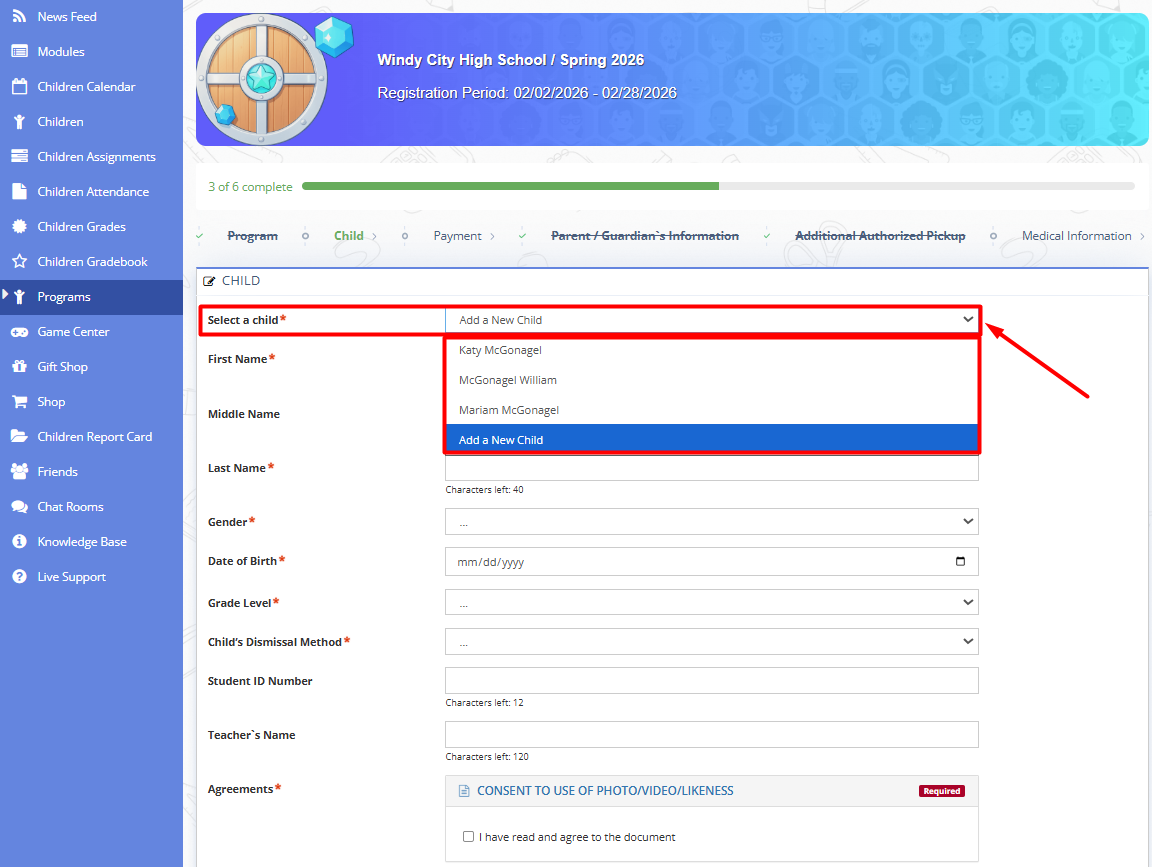
Fig. 7. Select a child - Read the Agreements. Check the Agreement consent and sign the documents. Click "Continue".
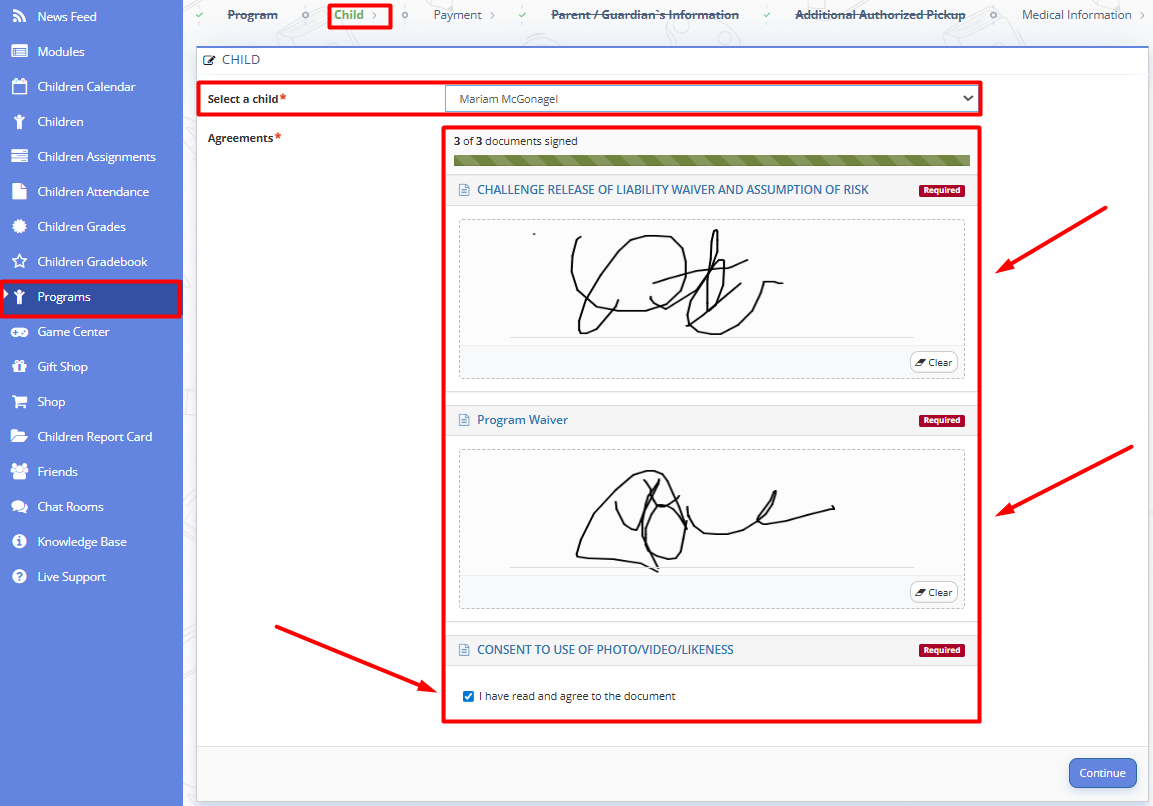
Fig. 8. Selected child and Agreements consent block - Payment checklist will appear to review the payment terms, subscription amount and total sum to pay. If a program is offered on a free basis, this step will be skipped.
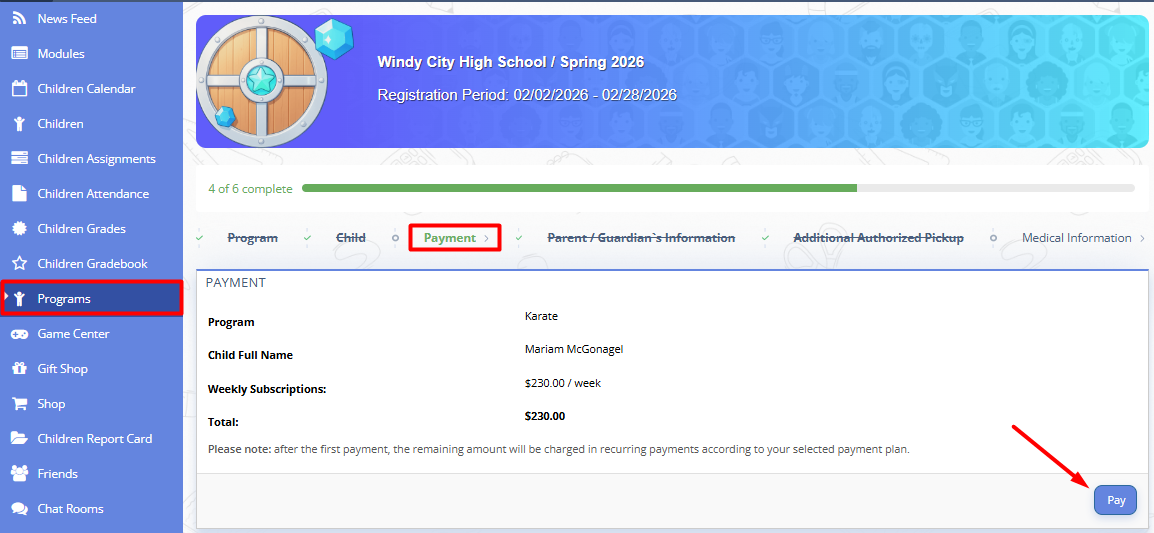
Fig. 9. Payment checklist - Click "Pay". You will be redirected to a Payment check-out page. Fill in all the required information and click "Subscribe".
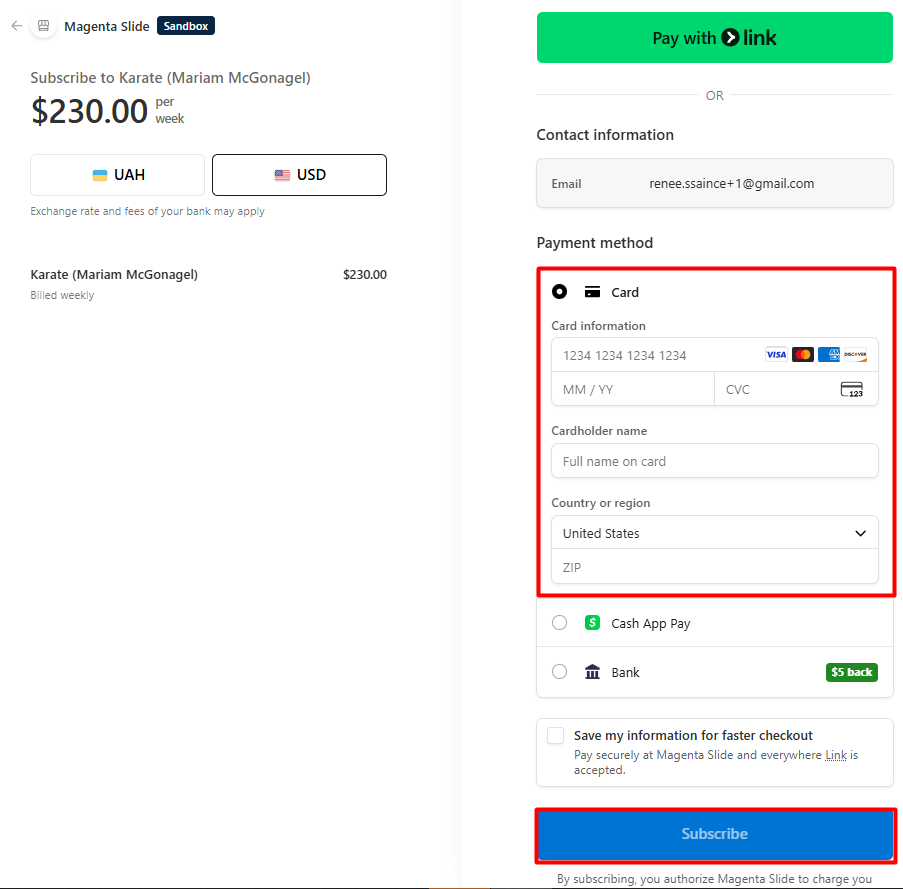
Fig. 10. Payment check-out page - The 'Parent / Guardian's Information' and 'Additional Authorized Pickup' forms are pre-filled with information from the previous registration.
- Fill in the Medical Information block.
- Before submitting the form, Parent must sign the consent by typing their full name as specified during Parent Sign Up - First Name followed by Last Name or choosing another e-signature option like drawing or checkbox offered by the Program provider.
- If a Parent somehow left the registration form incomplete, the notification alert will follow on every page.

Fig. 11. Incomplete program registration alert - Once the registration form is submitted, the successful registration notification will be displayed.
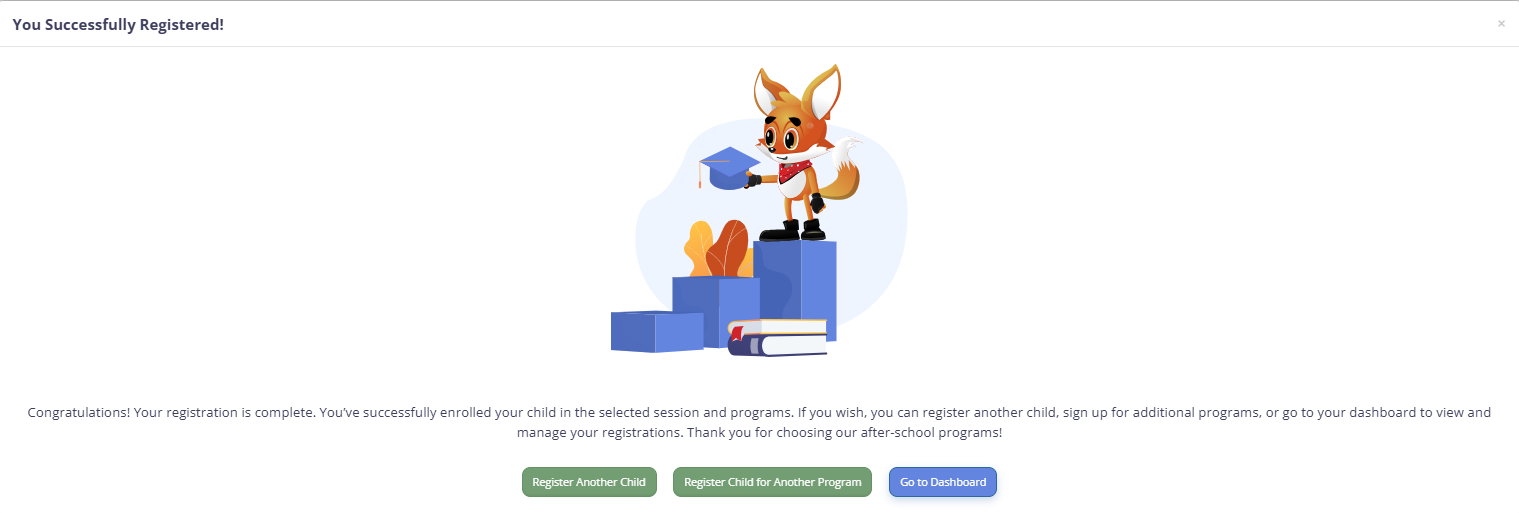
Fig. 12. Program registration succeeded


Add existing Child to the New Program
- Click the 'Add Program' button in the context menu of the specific child in the Children list from the Programs menu section.
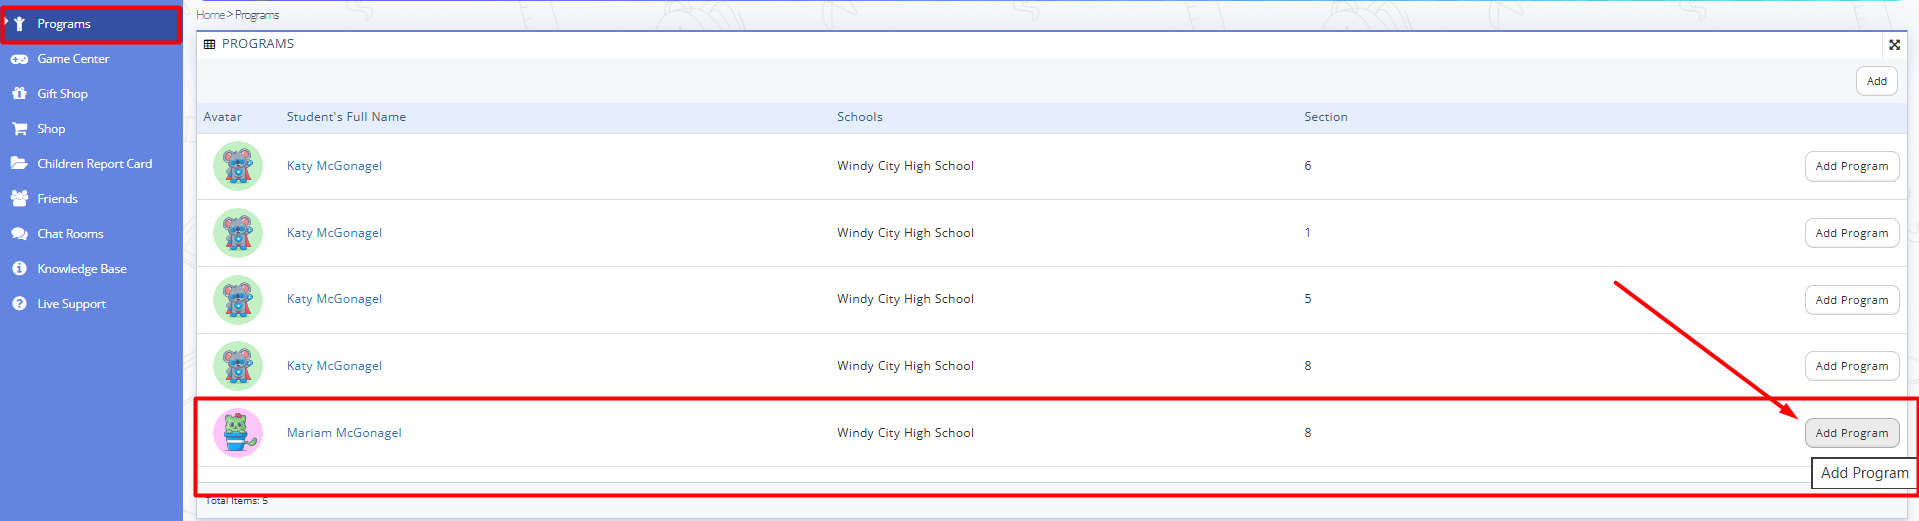
Fig. 13. Adding existing child to a New Program - The 'Program' form from newly initiated Onboarding Checklist is displayed.
- Select the required Program.
- The Child's information block will be pre-filled.
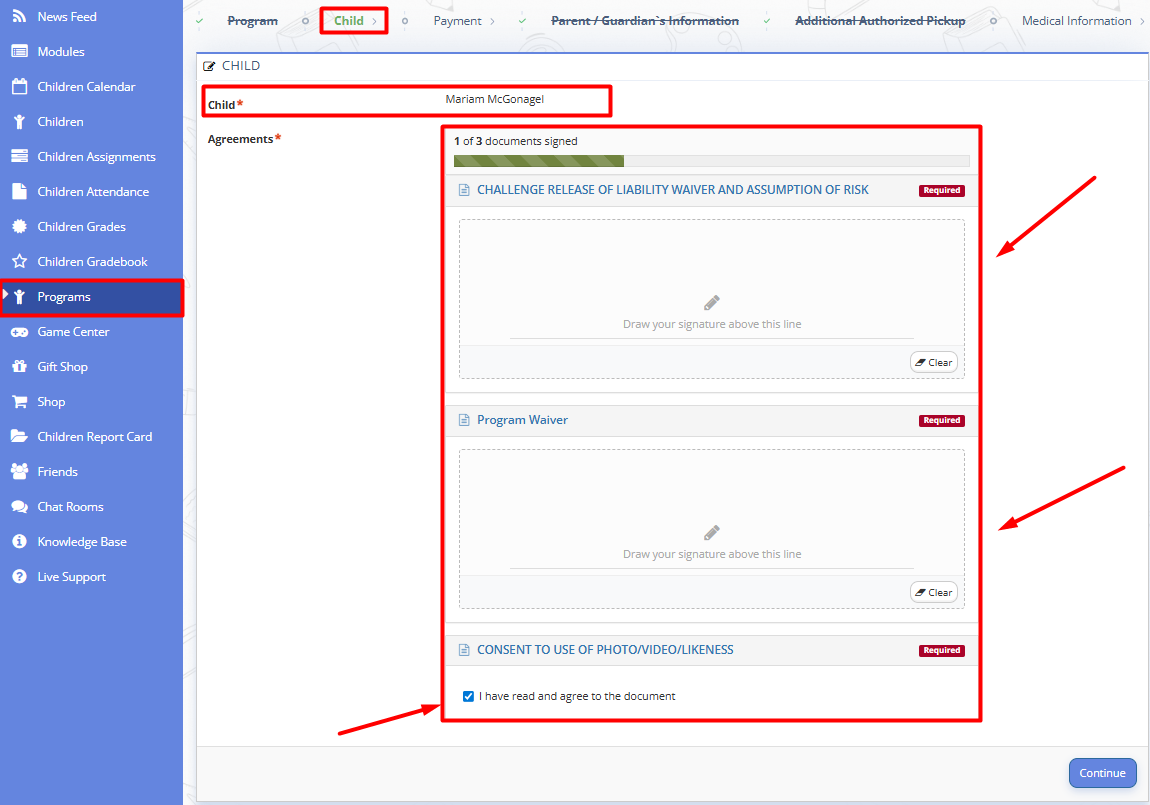
Fig. 14. Pre-filled Child and Agreements consent blocks - Read the Agreements. Check the Agreement consent and sign the documents. Click "Continue".
- Proceed with steps 6-10 from the user guide above to complete the registration.


Register A Child to Another School's Program
- Log in to your existing Prosvita account.
- Copy and paste the unique registration link for the school/program into the browser's address bar.
- The registration form will open on a separate page and will be ready to complete for the additional child.
- On the "Child" step, create a new child.
⚠️ Important: You do not need to create the child from the Prosvita account page. The child should be added through the registration form.
- Proceed to the next steps as described in the instructions above.
Parent Dashboard modules
From the Parent Dashboard, parents can monitor their children calendar, homework assignments, attendance, grades, gradebook and generate report cards.
Parents can enable/disable the workspace modules according to their preferences by navigating to the "Modules" menu section and activating necessary modules. The activated modules will show up in the navigation menu on the left.

Fig. 15. Parent dashboard modules
Children Calendar
This section displays the child’s class schedule as well as other events (such as holidays or additional activities). It allows parents to quickly see when and what classes are planned.
Children Assignments
This section contains all assignments and learning tasks. Parents can view assigned tasks for each subject, deadlines, and their status (completed, in progress, review or cancelled).
Children Grades
It is a dedicated space designed for parents to monitor their children's academic performance and track specific feedback from teachers.
Children Gradebook
It functions as a digital student diary providing parents with a real-time overview of their child's school/program week.
The information is organized in a calendar-like grid where the rows represent the days of the week (Monday, Tuesday, etc.) and the columns provide the following details:
- Subject: Displays the name of the class, the time (e.g., Spanish at 4:30 pm), and the teacher’s name (Robert Johnson).
- Assignment: This area lists what needs to be done. There is also a "Note" button, which likely contains specific instructions or attachments from the teacher.
- Attendance: A column featuring a small icon that indicates whether the child was present or absent for that specific class.
- Grade: The final column displays the score or mark received for that specific class or task.
If a Parent has several children, there is a drop-down filter to select a child.

Fig. 4. Children Gradebook Page
Children Report Card
This is where parents can generate formal summaries of their children's academic performance for specific terms/sessions or school years.
- To create a report card, navigate to the "Children Report Card" menu section on the left.
- Click "Create" on the top right corner of the page.
- Fill in the fields in the form:
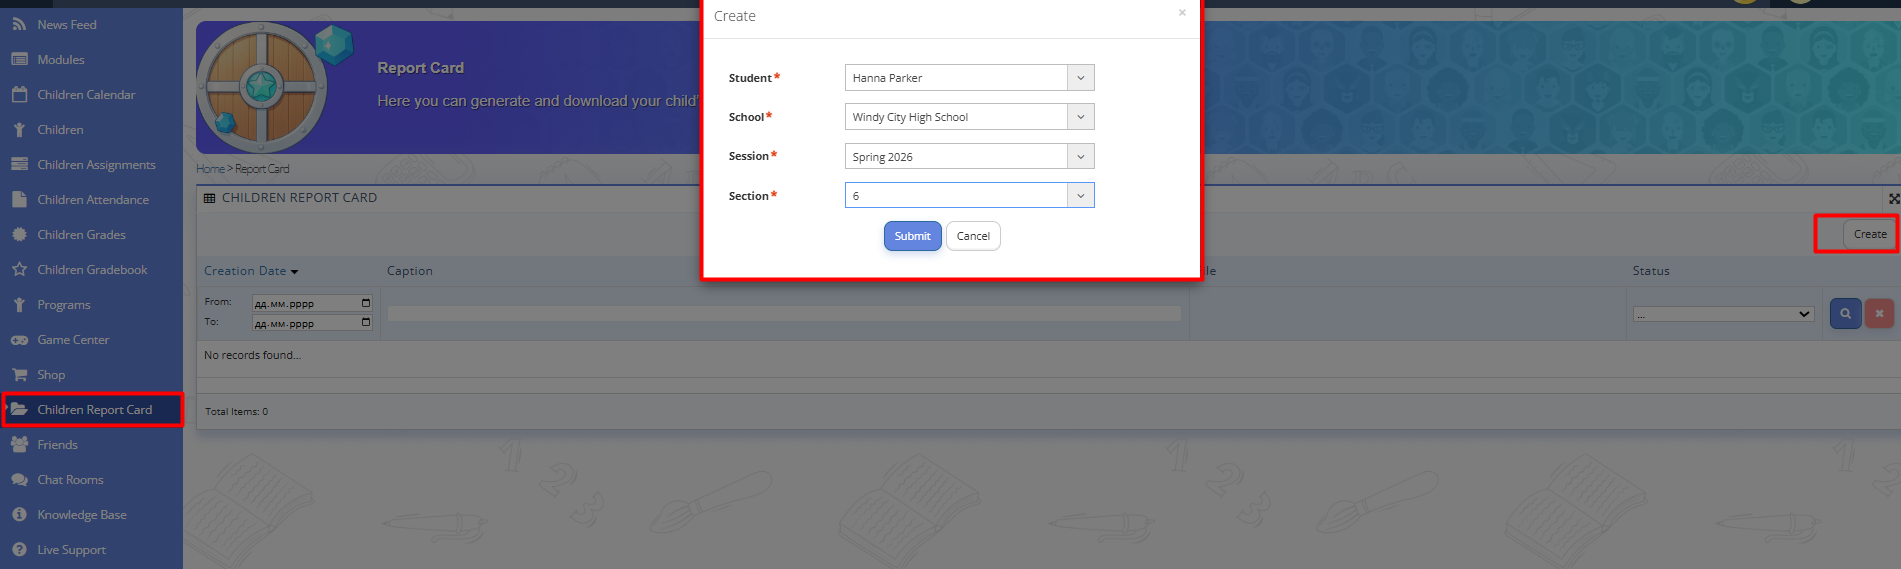
Fig. 5. Children Report Card Page - Click "Submit".
- Once the process of generating the document is switched from the Pending to Success status, a Parent can download a report card by clicking on the arrow icon under the PDF file.
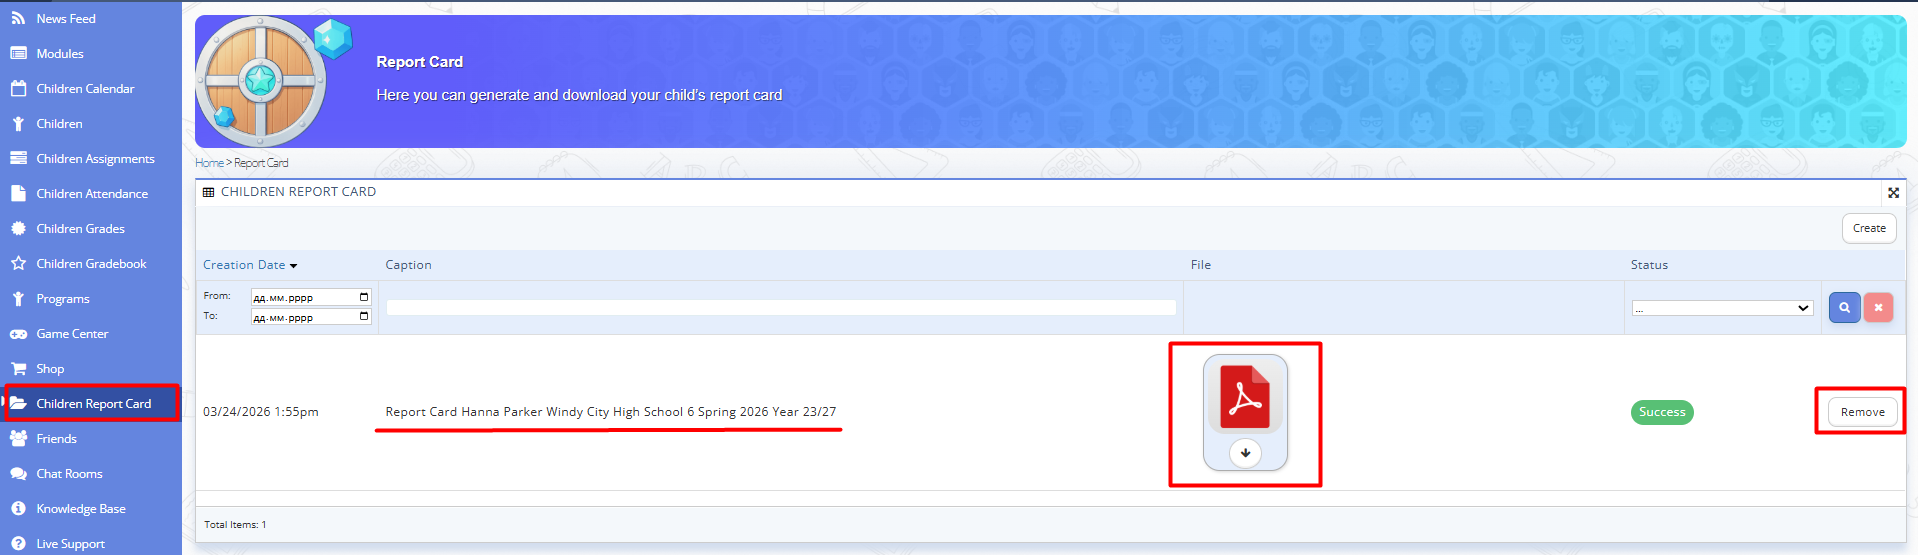
Fig. 6. Download the Children Report Card Page - The generated report card can be removed by clicking the "Remove" button on the right to the PDF file.

Other Parent Dashboard Menu Sections:
Game Center
Shop
Friends
Chat Rooms
Personal Profile Settings
In case you face any issues on the platform, you can address our Support Team by initiating an online support chat via "Live Support" Menu Section or sending an email to support@prosvita.net.